Thursday, November 21, 2013

50 Days of Crafts: Felt Cup Warmers

I have seen this coffee cup cozy idea floating around Pinterest for a while and it seemed easy enough to create.  In fact, this Mickey Cup Cozy craft has been on my Pinterest "to do list" for a while.  Since I love all things MOUSE related, I thought I'd try it out myself.

My finished project was a little too small (I did not use their template) and I used velcro & the sewing machine instead of elastic thread and a hot glue gun.  TIP: If you happen to have an empty cup sitting around from your last coffee run, use your sleeve as a pattern for your cup cozy.
  
For my version of the project you need: felt (scraps will do!), two buttons, thread (black and white), needle (for button sewing), scissors (straight and pinking shears), and velcro.  I also put a thin piece of batting in the middle for extra protection!

Not just for coffee cups!  I LOVE how it dresses it up my pen holder (aka Tin Can) on my desk.  Wrap one of these around a can filled with chocolate or candy canes and you have a sweet gift!

I have another one of these in the works, but the reveal will have to wait until after Christmas.


Craft Kits: For the Un-Craftie

I thought that my readers might enjoy this post from the ETSY blog:

https://www.etsy.com/blog/en/2013/editors-picks-holiday-crafts-and-kits/?ref=fp_blog_title

You can purchase craft kits to make items yourself!  I particularly love the Screen-Printed Advent Kit from BlueberryPark and the Peg People from Goose Grease.  I have made a few peg people in the last year and they are delightfully fun to paint and the kids LOVE them!

Monday, November 18, 2013

Quick & Easy Kid Crafts: Wooden Masks

Ever see those wooden masks in the dollar bin at Joann's and wonder what the heck you would do with them?  Wonder no more!  I turned a class of preschoolers loose with some materials and these $1 masks for an amazing creative experience!  

I love how every one of these turned out different and unique!  Watching kids decide where to put the decorations was amazing. Some were very methodical. Some were random. Some of them were methodical, but you would never know it because they added so many things to it!  

I really enjoyed sharing in this experience.  I never would have thought to do some of the things they did, like put pompons on the cheeks!   

If you already have an art stash going, then this project is easy to throw together for the 3+ crowd or any kid who can handle a glue bottle!

Sunday, November 17, 2013

Fabulous finds: kids Christmas crafting

Headed out with my two girls to pick out a Christmas present for my nephew. We ended up at Walmart as it was the nearest big box retailer to the craft store. I know that you think I'm going to tell you about all the great crafts I found at Joann's.  I'm not.  Instead, we found some cool stuff at the Walmart which is just perfect for my kids.  


First up, plastic ornaments.  It has been hard for me to find plastic - not glass - to use with the kids. They love to paint these and our regular painting time will extend to an hour if they have these to paint. I bought two for myself to try a few techniques on also!  These plastic ornaments were only 88 cents a piece, far cheaper than the craft store, and are easy for kids under four to paint with acrylic paint.  I found them on an end cap in crafting.  Don't go looking for them in the Christmas section!

Next, these awesome wood shapes! For less than $2 a piece I got these Christmas theme wood shapes on stands.  The possibilities are endless!  For the kids: paint, stickers, markers, glitter, collage!  For adults, these are screaming out for some mod podge!  I'm excited to use up leftover Christmas scrapbook supplies on three sweet trees.  I know the kids will love painting these wooden shapes too!


Saturday, November 16, 2013

Christmas Rag Garland

This sweet rag tie garland requires no sewing and no hot glue gun.  In fact, you only need a few items and about half a football game's worth of time to finish it!


I love the way this looks on our mantle and it really finishes off the festive feeling of Christmas.


You just need a few supplies.  For this approximately 6' garland, I used one yard each of two coordinating fabrics.  I cut the strips approximately 1.5" wide by 6", but, honestly, I mostly guessed and just eyeballed it.  Don't make yourself crazy measuring!


TIP: Alternate fabrics in a 1:1 ratio to give this a more cohesive look.  I had originally started by alternating three strips of each color, but it did not look right at all.  This way looks perfect!

Measure your length, remembering to take into account any scallops and adding a few extra inches for hanging. 

Find yourself a comfy seat and get to it!  Tie your strips on your twine until you run out of fabric!  Enjoy your fluffy garland!

Saturday, November 9, 2013

50 Days of Christmas Crafts: Update

It is late on a Saturday night.  I do most of my crafting after the kids go to bed.  I can hear the rain on the window every now and then.  I am reminded that it is cozy in here.  I am surrounded be felt.  It is on the desk next to me, bits and pieces of it strewn about, scraps on the floor, and yards of it kicked under the table while I created.  A huge tangle of felt scraps awaits me at the end of the table.

I spent the last three days gathering supplies, templates, patterns, and cutting lots and lots and lots and lots of items.  I've found the best way to make "sewing" crafts (i.e. felt projects, dresses, costumes) is to cut everything at once and then sew.  Otherwise, you hop back and forth between the sewing machine and the cutting table, making yourself very tired, and getting very discouraged.

What this really means is that I have not completed any one thing, but I have many things underway.  Check out my Christmas Craft List to see what I've started.

Wednesday, November 6, 2013

50 Days of Christmas Crafts

At the beginning of this year I challenged myself to complete at least 52 Pinterest projects by the end of the year.  That was only one a week, but I really only needed two months to complete that goal!  Over the summer I completed another 52 projects as I made props for an epic photo shoot.  So, here we are, 50 days from Christmas, and I think that it's time to get craftie once again!

Here's a rundown of what I'd like to make over the next 50 days: (Bold has begun, Red is complete, underlined blue links will take you to the finished post!)

FELT PROJECTS
1 Felt Ornaments: animal & Santa shapes
2 Felt hearts with pine cone garland
3 Poinsettia tree skirt
4 Felt Wall Tree (for kids to decorate with other felt things!)
5 Felt Cup Holders
6 Letters
7 Bows
8 Felt trees on sticks
9 Lily Pond Playmat (gift for Elizabeth)
10 Campfire (gift for Emily)
43 Felt Ornaments: Small World Inspired

NON-FELT ORNAMENTS
11 Paper ornaments--has been recreated as a paper project instead!
12 yarn-ball reindeer ornament
13 Chalkboard Printable Ornaments
14 Chalkboard Hand-Lettered Ornaments
46 Mickey Ornaments (3 kinds)

HOME DECOR
15 Red Branches in a bucket
16 Small domes with holiday/snow scenes
17 Mickey topiary
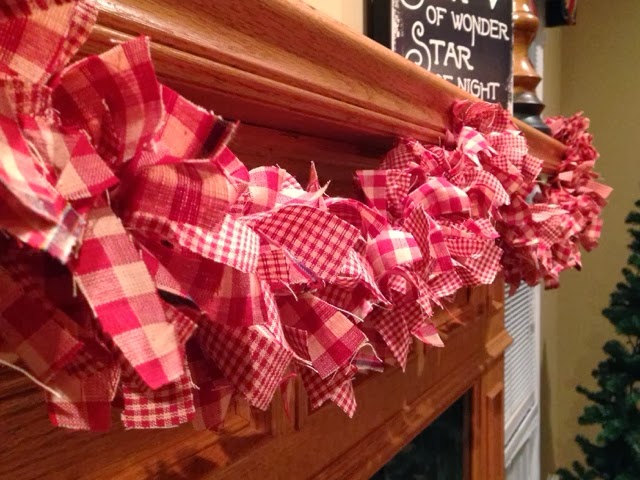
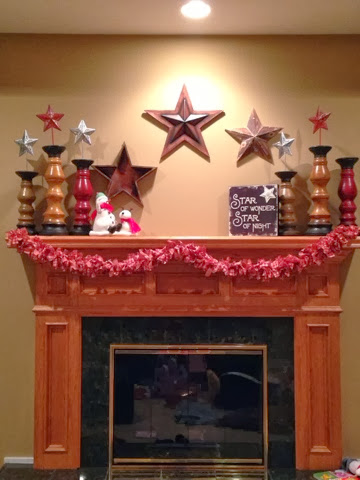
18 Red & Brown Rag Garland
19 Garland Wrapped Monogram
20 Vintage fabric-wrapped candy canes
21 Sharpie Projects: pillows, mugs, or ornaments
22 Yard stick lit star
23 Joy, Love, Merry Pillows
24 Frame & Hang "MistleTOES" from last year
25 Star Garland
26 Christmas Clothes Pins

GIFTS
27 Penguin, Dinosaur, and Monster Mittens
28 Ribbon Ruffle Tree Tees
29 Christmas Hershey Kisses
30 Printable Vintage Tickets (tags)
31 Onesie Ornaments
32 Car "Sash" for wearing your matchbox cars
33 Butterfly wings
34 Chalkboard Present Labels (Hand lettered)
35 Disney Countdown Blocks
44 Print & Laminate Alphabet Tracing Cards
45 Maroon Wrap (for myself!) :)
47 Dinosaur Tail
49 Fabric drawstring bags
50 something to hang over our bed

MAKE WITH THE KIDS
36 Stamped Christmas Trees
37 Penguin Pals
38 "Believe" red blocks
39 Reindeer Thumbprint ornaments
40 Clay Handprint Santa Ornaments
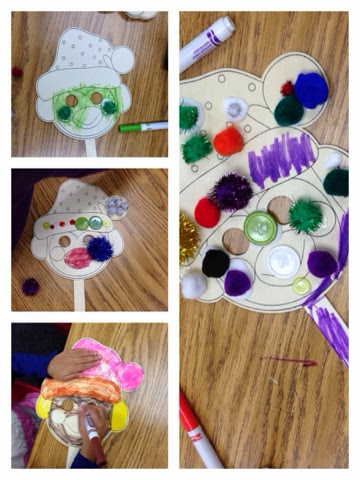
51 Snowman Sticks
41 Snow Friends Decor
42 Chocolate Covered Pretzel Sticks for gifting!
48 Gingerbread Houses